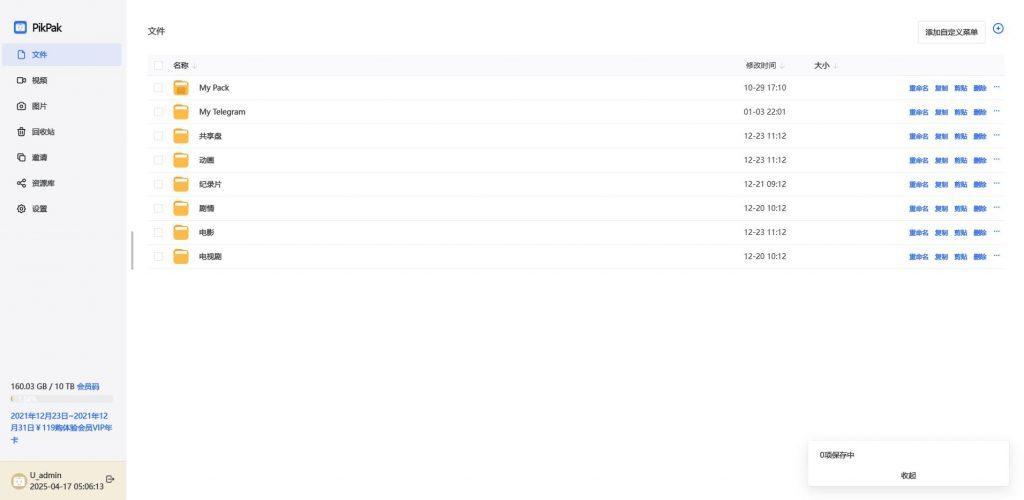
使用Github+Cloudflare Worker 搭建免费的 PikPak 网页版

PikPak这个网盘十分好用,但是目前官方只有安卓客户端,对于PC和MAC电脑用户就十分不友好。
好在网友的力量是强大的,现在Win,Mac,Web的第三方客户端都被开发了出来。
这次就是水一篇教程,教大家怎么用Github+cloudflare worker搭建一个免费的PikPak网页版出来,教程偏新手向。
提醒:这样部署的需要你能够访问github,不然你还要再用Cloudflare Worker部署一个反向代理服务,去反向代理github,反代的教程一搜一大把,我就不说了。
源码:https://github.com/tjsky/pikpak (感谢原作者mumu大佬,遵循大佬的意愿,这里删去他的全名)
Demo:tjsky.github.io/pikpak/
网页版使用教程:https://www.tjsky.net/?p=220
文章目录
注册必须的账号
分别是pikpak github cloudflare,如果你已经都有了,请跳过这一步
pikpak账号
使用官方的安卓客户端注册,没有安卓手机的,要么借一个手机,要么电脑上用模拟器,要么电脑上用第三方客户端注册吧。
PS:如果你最开始登录PIkPak客户端是用的谷歌账号关联登录,请在客户端内点击右下角图标,再点击左上角你的头像,修改密码/找回密码。
GitHub
注册地址(https://github.com/signup)
输入邮箱地址和密码,选择免费计划,验证邮箱地址,按照提示操作,创建您的个人帐户。
PS:如果你感觉部分内容是英文的识别困难,用浏览器的翻译功能吧。
CloudFlare
注册地址(https://dash.cloudflare.com/sign-up)
输入您的电子邮箱地址和密码。单击 Create Account。
PS:CloudFlare有中文界面,在右上角切换
一个你自己的域名
什么域名都行,需要在CloudFlare管理,如果没有也不想掏钱买,可以看这个教程注册freenom免费域名的方法
Cloudflare Workers部署
基本部署

1. 登录你的Cloudflare
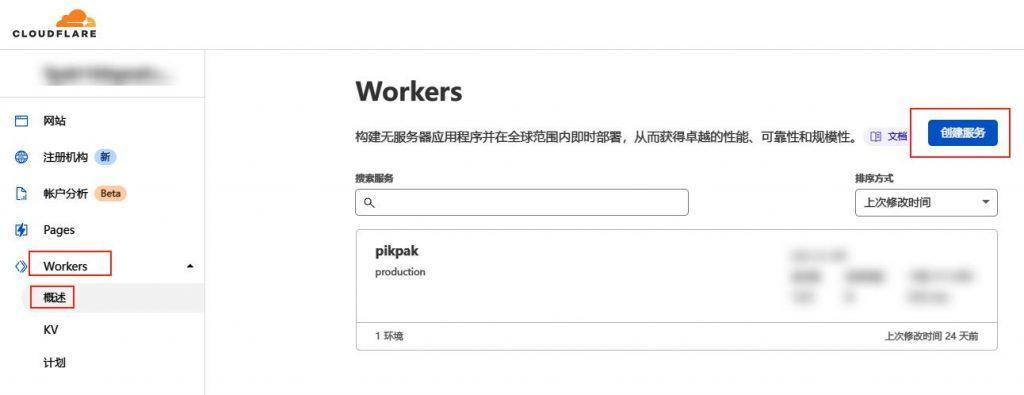
2. 在主页右侧找到【Workers】
3. 点进【Workers】选择一个预设的子域,点击【set up】之后,我们选择免费套餐。
4. 点进【Workers】,选择【创建Workers】
5. (非必须)在服务名称里起个好记好写的名字,比如pikpak,方便自己记忆。记住下边写的那行
您的服务将被部署到:https://pikpak.XXXXX.workers.dev
下边的【简介】、【HTTP处理程序】随便选一个就行。点【创建服务】
6. 删除页面左侧代码框内一切内容后,把这里的代码https://github.com/tjsky/pikpak/blob/main/cf-worker/index.js (感谢小樱修改的反代代码)粘贴到页面左侧的输入框,覆盖原有内容。
7. 点击【保存并部署】按钮,
8. 记住你在第5步里的Worker的域名pikpak.XXXX.workers.dev之后要用到。
9. 你的反代是会对所有人公开的,反代代码也没有鉴权部分,所以请不要使用对部署的Cloudflare Workers付费。
绑定自定义域名
因为部分运营商屏蔽了Cloudflare Worker的默认域名YYY.XXXX.workers.dev,导致无法使用Cloudflare Worker顺利反向代理,表现为无法刷出文件列表,无法登录。使用全局代理后就正常。
如果你需要在国内直连使用,请参照这篇文章《Cloudflare Workers 添加自定义域名 解决部分区域网络无法访问的问题》,给Worker绑定一个你自己的域名。如果你这样做了,请把后续需要填写Workers域名的地方,替换为你自己设置的域名。
GitHub部署
Github Aciton
- 登录你的Github,并且进入项目(https://github.com/tjsky/pikpak)
- 点击右上角的【Fork】将项目复刻到你自己的仓库
- 点击上侧一排的最后一个按钮【settings】切换到设置页面
- 选择左侧的【secrets】项,点击【new repository secrets】
- Name填
CF_DOMAIN,Value填你Worker的域名(Cloudflare Workers部署第五步里让你记住的那个域名或者你绑定的自定义域名,比如)pikpak.XXXX.workers.dev(注意只是域名本身,不带https://之类的累赘),点【Add secret】 - 如果你修改了仓库名则进行这一步,否则直接执行下边的第7步 :
点击【new repository secrets】,Name填BASE_PATH,Value填你的仓库名如tjskypikpak - 点击左侧的【Actions】>>>点击【General】>>>页面往下拉,找到【Workflow permissions】中,选择
Read and write permissions给action可读可写仓库的权限。然后点【save】按钮保存设置 - 点击上侧一排的【actions】按钮,点【I understand my workdlows, go ahead and enable them】表示你明白你要干啥。
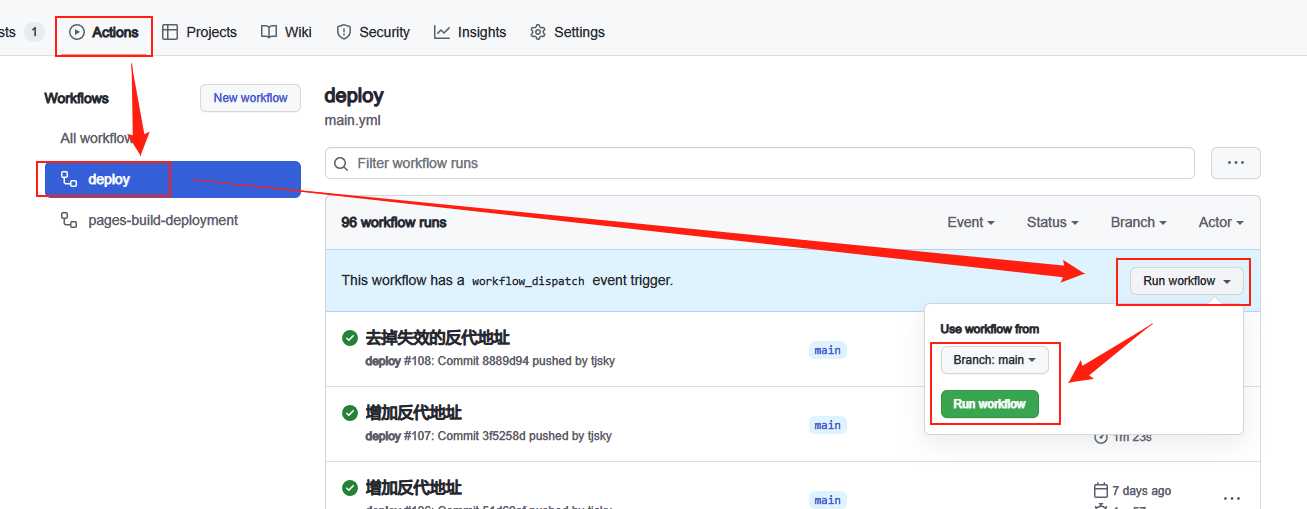
- 点击左侧的【deploy】,点右侧的【Run workflow ▽】切换到main分支,选择绿色的【Run workflow】 按钮。等待代码被构架并运行,如果没出什么问题,你会看到一个绿色√出现。(不超过5分钟)

Github Page
- 再次点击上侧那一排按钮中最后的【settings】切换到设置页面
- 这次选择左侧的【pages】
- 把Source这一项的branch切换到【gh-pages】【/(root)】,然后点击保存。
- 等1分钟左右你就可以通过页面上部显示的
Your site is published at https://tjsky.github.io/pikpak/
访问你的PikPak网页版客户端了。
后期更新
因为网页版还在不断的迭代中,上游代码更新后,如果你希望更新,那么需要这样更新一下
更新正常流程
- 回到你的Github主页(https://github.com/)切换到项目。
- 点击【Fetch upsteam ▽】,如果上游有更新,【Fetch and merge】按钮会是可点击的,选择【Fetch and merge】。
- 正常来说,没自己改过文件,就不会出问题,Github Aciton会自动重新deploy,在几分钟内就更新好了。如果出现无法合并,deploy时出错等等问题,要么自己介入处理导致了报错的文件,要么用更新出错时流程更新吧。
PS:只需合并main分支即可,不需要合并gh-pages分支,合并main后deploy会更新gh_pages分支内容。 -
检查一下(https://github.com/tjsky/pikpak/blob/main/cf-worker/index.js)在你部署后有没有更新过,如果有更新,将更新后的代码,更新到你的Workers中,重新部署Workers
更新出错时流程
这个操作不是最简单的,但是是最不容易出错的方式
- 首先注意一下https://github.com/tjsky/pikpak/blob/main/cf-worker/index.js 在你部署后有没有更新过,如果有更新,将更新后的代码,更新到你的Workers中,重新部署Workers(或者就直接不管是否更新,就直接无脑复制过去重新部署)
- 回到你的Github主页(https://github.com/)切换到项目,选择【settings】,拉到底,在Danger Zone中找到【Delete this repository】,在输入框中输入他要求的
XXXX/pikpak删除整个仓库。 - 然后重新执行一遍 GitHub部署 操作
一些可能需要你注意的东西
- 最好自己部署并审查代码,毕竟涉及了一次反代,如果在反带部分动动手脚,反代的搭建者是很容易知道你存了什么东西的。(当然能动手脚的地方不止这一处,想干坏事的人的方法多了)
-
没必要绑定自己的域名,用github.io就好,github的那个绑定咋说呢,广播的有点慢。进行绑定子域时,站点会有不短的一段时间都无法访问,尤其是在你设置了HTTPS时。
-
一般来说没必要改仓库名,保持是XXXX/pikpak,如果你真的希望改,请新建一个secrets,Name填
BASE_PATH,Value填你的仓库名如/tjskypikpak。 -
如果你想绑自己的域名,因为绑定后地址就从类似
tjsky.github.io/pikpak/变成了类似pikpak.tjsky.net的无子目录状态,所以新建的secrets,Name填BASE_PATH,Value填一个/就可以了。 -
Cloudflare Workers是有限制的,免费计划每分钟最多1000次请求,每天最多10W次请求,超了就会报错。
-
这个的部署方式非常多,比如你可以用cloudflare page代替GitHub page部署网站,可以用自己的服务器,替代Cloudflare Workers去做反代。。。等等很多方式。
-
最近官方出了邀请新用户得会员的活动,这里说一下怎么把网页版登录页里的邀请注册换成你自己的:
– 首先在官方APP里得到你的邀请链接(类似https://toapp.mypikpak.com/activity/invited?code=367394&g=1)
– 然后新建一个secrets,Name填INVITE_CODE,Value填邀请链接中的数字,比如我的是367394
- 20220101更新:如果你用的是最新代码部署,你的网页版右侧栏有个【邀请】标签,可以直接看到你的邀请链接和下载你的专属邀请用APK。对于IOS用户十分方便
- 可以在secrets里自定义的东西
Name Value CF_DOMAIN CF反代的域名(写DIRECT就是不走反代) BASE_PATH 自定义仓库名 INVITE_CODE 设置你的专属邀请链接 CNAME_DOMAIN 如果你设置了CNAME这里写你的域名 -
资源库已经无了,一帮人往里塞儿童色情内容,风险太高,原作者就关闭了资源库的后端,所以资源库彻底无了。
-
清理本地Cloudflare Workers反代域名设置。
– 以chrome浏览器为例:依次打开浏览器设置,隐私设置和安全性,Cookie及其他网站数据,查看所有Cookie和网站数据。
– 在“搜索Cookie”框内输入 github.io 将搜索出来的带有pikpak图标的结果,比如tjsky.github.io,点右侧那个垃圾桶图标,删除网站的本地数据。
– 重新访问站点,比如上述的:https://tjsky.github.io/pikpak/就好了。
– 如果你用的是其他站点,请参照上述域名样式删除网站的本地数据
- 站点和反代是会对互联网上的所有人都开启公开访问的,当文件夹下文件与文件夹数量很多时,每次访问目录都需要消耗大量的 Cloudflare Worker 额度,你的 Cloudflare Worker 每日免费额度是10W次,如果一个不够,可以同时申请多个Cloudflare账号,部署复数个Cloudflare Workers。


多少
2024-06-08 18:59
现在登录要验证
abcd
2024-05-25 23:02
I was using ur website(https://tjsky.github.io/pikpak).
Thanks for making great website.
But now, I can’t login to pikpak by ur website.
When I click login, it says “Please add captcha before you register”
How can I solve this problem?
Thanks
一个路过的网友
2024-01-09 21:57
你好,可不可以用香港服务器搭建,能出个宝塔面板搭建教程么
xxnl
2023-12-30 11:15
我在worker部署好了,不知怎地跳转百度首页。。
去年夏天
2023-12-30 20:28
跳转百度就是有步骤出错了
hangaj
2023-12-27 22:02
手机登录一定要验证码吗
去年夏天
2023-12-29 10:59
对。。建议绑个邮箱,用邮箱+密码登录
ylong
2023-10-18 18:11
反代成功,但是登录不了是怎么回事呀?
dddd
2023-08-04 12:15
提示这个怎么办
npm WARN deprecated vscode-pug-languageservice@0.27.24: WARNING: This project has been renamed to @volar/pug-language-service. Install using @volar/pug-language-service instead.
npm WARN deprecated @volar/html2pug@0.27.13: WARNING: This project has been renamed to @johnsoncodehk/html2pug. Install using @johnsoncodehk/html2pug instead.
npm WARN deprecated vscode-typescript-languageservice@0.27.25: WARNING: This project has been renamed to @volar/typescript-language-service. Install using @volar/typescript-language-service instead.
npm WARN deprecated vscode-vue-languageservice@0.27.30: WARNING: This project has been renamed to @volar/vue-language-service. Install using @volar/vue-language-service instead.
npm WARN deprecated ali-oss@6.16.0: this version has been deprecated, please use 6.17.1 instead
added 374 packages, and audited 375 packages in 21s
12 vulnerabilities (5 moderate, 4 high, 3 critical)
To address issues that do not require attention, run:
npm audit fix
To address all issues (including breaking changes), run:
npm audit fix –force
Run
npm auditfor details.src/views/setting.vue(175,3): error TS2305: Module ‘”../config”‘ has no exported member ‘serverNumbers’.
src/views/list.vue(292,10): error TS2305: Module ‘”../config”‘ has no exported member ‘serverNumbers’.
src/config/index.ts(1,14): error TS2451: Cannot redeclare block-scoped variable ‘proxy’.
src/config/index.ts(3,14): error TS2451: Cannot redeclare block-scoped variable ‘proxy’.
Error: Process completed with exit code 2.
yahi
2023-07-16 14:39
aria2能加个同时从多个不同服务器下载的功能吗?谢谢大佬
wdxb
2023-07-06 00:31
部署好了但是是白色的怎么办
Flyingcrate
2023-05-17 18:05
有什么方法可以自动将文档从 pikpak 传输到其他云服务?就像从 pikpak 到 google drive teamdrive 或者更优选的是一个机器人将文档从 pikpak 发送到电报频道以利用无限存储?
去年夏天
2023-05-17 19:37
有,自建的TGbot可以实现这种方式:对tgbot提交磁链–下载到pikpak–再从pikpak搬运到onedrive或Googledrive等任何可以rclone挂载的网盘。
Flying crate
2023-05-18 18:35
如何通过 rclone 将文档从 pikpak 传输到 gdrive?我不知道 pikpak 支持它配置在哪里
小河
2023-05-05 18:05
请问docker可以部署吗
去年夏天
2023-05-06 10:16
直接在dockerhub仓库里搜pikpak
啦啦啦
2023-04-05 20:18
按照(注意的东西)里面设置自定义域名,设置了好久还是不行,设置好域名之后打开域名是空的,就右上角有个github,secrets and variables里面Secrets和Variables都尝试设置过BASE_PATH加/,还是不行,求助
hhhhhh
2023-03-17 13:53
点击左侧的【deploy】,点右侧的【Run workflow ▽】切换到main分支,选择绿色的【Run workflow】 按钮。等待代码被构架并运行,如果没出什么问题,你会看到一个绿色√出现。
大佬,这一步不知为啥,运行不了显示红色的X
把Source这一项的branch切换到【gh-pages】【/(root)】,然后点击保存。
https://files.catbox.moe/typp2g.png
https://files.catbox.moe/p7b5i3.png
没有得选gh-pages,那咋办
去年夏天
2023-03-17 14:16
后一个没有得选gh-pages是因为:前边是的步骤是红叉没生成gh-pages
Run workflow 你点右侧出错的项目,我看一下
hhhhhh
2023-03-17 16:39
Run JamesIves/github-pages-deploy-action@4.1.5with:
branch: gh-pages
folder: dist
token: ***
clean: true
GitHub Pages Deploy Action 🚀
🚀 Getting Started Guide: https://github.com/marketplace/actions/deploy-to-github-pages
❓ Discussions / Q&A: https://github.com/JamesIves/github-pages-deploy-action/discussions
🔧 Report a Bug: https://github.com/JamesIves/github-pages-deploy-action/issues
📣 Maintained by James Ives: https://jamesiv.es
💖 Support: https://github.com/sponsors/JamesIves
Checking configuration and starting deployment… 🚦
Deploying using Deploy Token… 🔑
Configuring git…
/usr/bin/git config user.name conmor
/usr/bin/git config user.email conmor@users.noreply.github.com
/usr/bin/git config –local –unset-all http.https://github.com/.extraheader
/usr/bin/git remote rm origin
/usr/bin/git remote add origin ***github.com/conmor/pikpak.git
Git configured… 🔧
Starting to commit changes…
/usr/bin/git ls-remote –heads ***github.com/conmor/pikpak.git refs/heads/gh-pages
Creating worktree…
/usr/bin/git worktree add –no-checkout –detach github-pages-deploy-action-temp-deployment-folder
Preparing worktree (detached HEAD 0735c52)
/usr/bin/git checkout –orphan gh-pages
Switched to a new branch ‘gh-pages’
Created the gh-pages branch… 🔧
/usr/bin/git reset –hard
/usr/bin/git commit –no-verify –allow-empty -m Initial gh-pages commit
[gh-pages (root-commit) fc94769] Initial gh-pages commit
/usr/bin/rsync -q -av –checksum –progress /home/runner/work/pikpak/pikpak/dist/. github-pages-deploy-action-temp-deployment-folder –delete –exclude CNAME –exclude .nojekyll –exclude .ssh –exclude .git –exclude .github
Checking if there are files to commit…
/usr/bin/git add –all .
/usr/bin/git checkout -b github-pages-deploy-action/y3rlzlwt6
Switched to a new branch ‘github-pages-deploy-action/y3rlzlwt6’
/usr/bin/git commit -m Deploying to gh-pages from @ conmor/pikpak@0735c528513109986549170ee0610ac542a96a13 🚀 –quiet –no-verify
/usr/bin/git push –force ***github.com/conmor/pikpak.git github-pages-deploy-action/y3rlzlwt6:gh-pages
remote: Permission to conmor/pikpak.git denied to github-actions[bot].
fatal: unable to access ‘https://github.com/conmor/pikpak.git/’: The requested URL returned error: 403
Running post deployment cleanup jobs… 🗑️
/usr/bin/git checkout -B github-pages-deploy-action/y3rlzlwt6
Reset branch ‘github-pages-deploy-action/y3rlzlwt6’
/usr/bin/git worktree remove github-pages-deploy-action-temp-deployment-folder –force
Error: The deploy step encountered an error: The process ‘/usr/bin/git’ failed with exit code 128 ❌
Deployment failed! ❌
Warning: The set-output command is deprecated and will be disabled soon. Please upgrade to using Environment Files. For more information see: https://github.blog/changelog/2022-10-11-github-actions-deprecating-save-state-and-set-output-commands/
去年夏天
2023-03-17 17:21
点 Setting
点 Actions
点 General
网页拉到最下边
在”(Workflow permissions)”中,
选择 Read and write permissions
点SAVE保存
hhhhhh
2023-03-18 02:18
可以运行了,谢谢大佬
去年夏天
2023-03-18 10:59
这是github新出的限制,设定新的action时默认只有读权限,之前的action的项目默认开读写权限了,不需要执行这一步。也谢谢你的反馈。
dddd
2023-03-14 17:19
怎么能免登?我要在worker上用pikpak做图床
去年夏天
2023-03-14 19:50
经由worker请求pikpak下载时,CF请求的IP会乱跳,很容易触发pikpak的限制阈值,导致账号下载被禁用最长24小时。
如果是公开图床,容量不大的话可以考虑,backblaze B2 + Cloudflare CDN的免费方案
test
2022-11-07 13:43
大佬 我在群晖Docker里部署之后登陆页面输入账号密码无法登陆,点击登录按钮没有反应
hansun
2022-10-05 20:28
Error: The deploy step encountered an error: The process ‘/usr/bin/git’ failed with exit code 128
部署失败,提示以上错误